Category: Zinfandel Wine
Exactly how to Select a Wine Cellar to Fit Your Design and Budget plan
Posted onHow to Select a Wine Rack to Fit Your Design as well as Spending plan
Cultivating an appreciation of white wine is an expanding trend in the US. Shops concentrating on a glass of wine are showing up throughout the nation, not just in the standard winery areas of California, Oregon, as well as Virginia. People that might not have actually expanded up around wine are now attracted not only to tasting but additionally to accumulating it. Tasting parties and unique a glass of wine pairing events are an usual style in dining establishments and also in the home. With this comes an increase in interest in residence storage. While appropriate storage space can assist white wines end up being a lot more exquisite, incorrect storage space can result in wrecked a glass of wine.
A freestanding, temperature regulated wine cellar is suitable, however much a lot more pricey than an easy wooden or metal white wine rack. However, it is not essential to invest numerous thousand dollars to take pleasure in wine in your house. If you can discover a dark, amazing, slightly damp location in your home, you will be able to after that choose a straightforward rack that will keep your white wine for many years ahead. The excellent place will certainly be 50-60 degrees, with consistent 60-70 percent moisture.
Wine Cellar Sets
One method to reduce cost is to develop your own red wine rack. For new lovers, it is most likely best to adhere to a white wine rack set. There are several factors to consider when making a white wine shelf, as well as beginning from a kit will keep the a glass of wine in the rack where it must be – the last point you desire is the whole point to find crashing to the floor due to a mistake.
There are several commercially offered wooden racks that offer snap-together assembly, requiring absolutely nothing greater than a hammer. These inexpensive sets are normally made from redwood or ache, and also can be purchased for under.
The most essential thing to bear in mind when developing your own a glass of wine shelf is to consider the stamina of the rack. A bottle of wine considers roughly 3 pounds, so the weight accumulates promptly. Ensure not only the shelf but the flooring itself can manage the weight, maintaining in mind the weight of the rack.
If the kit is wood, make certain the timber has been dried appropriately (no greater than 14% dampness), which the samples are no much less than 3/8″ (1/2″ is better).
Additionally, see to it the a glass of wine is saved horizontally to make sure that the white wine remains in contact with the cork. A dry cork indicates that the red wine has been damaged.
Wine Shelf Capability
Just how much red wine do you need?
While having 1500 containers of wine available seems amazing, lots of people have neither the area neither the purse to sustain such an endeavor. If you want to have something for day-to-day, a 15-30 capability shelf must fulfill your requirements. That means, you can have 2 bottles of champagne, 3 bottles of red (red wine or cabernet), 3 bottles of white (chardonnay, pinot grigio, or white zinfandel), one container each of red and also white food preparation red wine, as well as still have space for a few special bottles that you intend to allow age for several years. Also keep a good red all set for business, and a reisling or shiraz for a hot dish. Have one container of gewurztraminer handy in the fridge (it will only last in there for a week), as well as you’ll be all set for any kind of celebration. A 30-bottle ability shelf suffices for a wine-tasting, an extended event, or for a person that likes to attempt a different wine everyday.
Likewise, bear in mind that most wine cellar makers note the overall bottle capacity. This might be various from racked a glass of wine capability, as complete ability might have containers stacked directly on top of each various other. While this will certainly not damage the red wine, it is not as aesthetically pleasing and also might be troublesome when getting the wine out of the shelf.
Designs of Wine Cellar: Area is Secret
Wine cellar come in several designs. Racks can be freestanding cupboards, counter top, or wall mounted.
When choosing a style, maintain the adhering to in mind:
Exactly how much space do you actually have?
Do you desire the wine cellar to be visible, or would certainly you rather have a large, covert wine cellar that does not necessarily match your house’s style?
Where can you put the wine rack?
One of the most integral part of your choice is the area. If you pick a rack that is not freestanding, make certain it is secured from resonances. It is not a great idea to place the wine cellar next to the sink where the disposal will certainly rattle it. Never ever position the rack on the top of the refrigerator, as it obtains hot. Likewise, keep the rack away from a window, as the temperature might differ excessive, and also UV light will certainly damage the red wine.
If you can not locate a wine cellar to suit that best location as well as you are not positive of making your very own, think about having a custom-made white wine shelf produced just for you. While this option is a lot more costly than an off-the-rack version, it is still a lot less than the freestanding systems, and can keep your white wine for several years to come.
Wine Cellar Material
Wine shelfs can be found in a range of materials, from wood to steel to glass. Whether you pick one made of mahogany or steel depends upon a selection of variables, consist of cost, weight, and look.
Wood Wine Cellar
The most common kind of wine cellar is the wooden wine rack. It is generally easier to construct as well as relatively light. Common woods are pine, cedar, spruce, oak, as well as redwood. One more much less common wood is mahogany. Mahogany is a top quality wood and is used in both moderate and expensive shelfs.
Metal A Glass Of Wine Shelfs
Steel wine cellar are coming to be increasingly popular, particularly those constructed from steel. They are extremely solid and also last longer than wood racks with much less treatment. They can be painted to match any kind of residence. They can additionally be created right into a bigger variety of shapes while maintaining their stamina.
Selecting a wine cellar ought to be a delightful procedure. Consider it an investment for all the white wines you will try today as well as those you will certainly maintain for an unique event down the road.
Guide to Mixing
Posted onOverview to Blending
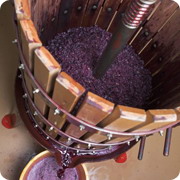
Mixing has actually become a highly valued component of the procedure of winemaking. Several wine makers as a matter of fact sight blending as an extremely evolved art kind. The keynote of mixing is to blend various wines in order to create a last white wine that has a quality that is remarkable to that of each of the different components however.
The most common type of blending involves mixing a minimum of two various grape varieties of red wine. Blending has come to be some a popular concept that numerous wine makers specifically grow their wineries for the objective of mixing by expanding a range of various grapes in order to create a combined field. One more means of accomplishing blending is to combine at the very least 2 different varieties of grapes that have been harvested independently however then ferment them together. This procedure frequently entails a minimum of one red grape and one white grape.
Still yet, you might select to develop a blend which has the very same grape; however, different fermentation containers are used. Since the containers are different they will certainly generate a taste that is somewhat various also though the grapes are essentially the same. You may also select to go so much as to produce a mix having wine from a batch that has been barrel fermented as well as another that has been fermented in a stainless steel container.
An additional means to mix wines is to blend glass of wines that are from various vintages. If you have been making your own a glass of wine for some time, there is a likelihood that you most likely have a few bottles of wine in your cellar that were created in different years.
It needs to be explained that there are some glass of wines that do not provide themselves especially well to blending. Chardonnays are recognized to not be particularly improved by mixing. Red Zinfandel and also Pinot Noir additionally hardly ever see many renovations from blending. There are likewise some wines which are too fragile for mixing such as Gewürztraminer.
When properly handled, blending can aid to balance the flavors as well as the degrees of tannins as well as acids. It needs to be mentioned that mixing can aid to enhance the top quality of red wines that currently at the very least rather excellent by themselves. Mixing one good red wine with a negative red wine; however, will not boost the bad red wine enough to produce a single great mixed wine. Generally, instead than the negative wine being enhanced, the great white wine will handle the lower top qualities of the bad red wine. If you have a negative white wine that you want to boost, think about mixing; a process that can eliminate an off taste.
Typically, if you are new to blending it is best to begin with simply two white wines. Several home wine makers discover the benefits of blending when they taste a white wine in order to see exactly how it turned out as well as find that it can be slightly much better. Blending offers you the capability to select the finest attributes of numerous red wines and afterwards blend them with each other to attain a far better flavor. While the process might seem complicated, even one of the most newbie residence winemakers can produce a good mix at residence.
The fundamental process of mixing entails testing, comparing the tastes and afterwards locating the ratio you favor for the final blend. Bear in mind that it is best to mix on a step-by-step basis, beginning with percentages and afterwards making minor adjustments up until you locate a favored mix. As you may wish to assimilate the future, it is a great concept to remember as you go along; noting how lots of millimeters of each white wine you have utilized for subsequent examinations.
It is also essential to note that in some situations, particular blends might need time in order for the individual elements to wed as well as accomplish a good taste. This is typically the instance with young merlots. Sampling a mix of young reds right away can offer you an incorrect idea of what the outcome will taste like. Whites; however, can generally be mixed as well as tasted right now.
A lot of winemakers discover that mixing produces much better results when it takes place as not long after fermentation as possible. Mixing right after fermentation will protect the end product from oxidation as well as also provides the glass of wines the chance to age together into a single wine instead than individually.
Valentines Day Red Wine And Also Food Concepts
Posted onValentines Day Wine And Also Food Ideas
Once More Valentines Day is below as well as even though it may not be main vacation it is an extremely crucial day for that special ladies in our life. So while we have a long time lets plan in advance for the big also and also make it a terrific day for that unique a person.
There are various methods to celebrate this wedding from the easy approach simply purchasing flowers and also perhaps some candy to the a lot more engaged level of not purchase the above things yet likewise other things like jewelry. It will extremely depending on how you really feel about this vacation after we all don’t celebrate it. But below are some great suggestions that you can attempt this year which will certainly help make this day special.
Lets begin off with a straightforward prepare for Valentines day begin by purchase some blossoms normally a Roses behave yet you angle blend them with various other flowers too in addition to a good vase if you don’t already have one. The following action is to get some sweet and red wine due to the fact that in this action we are going to do some pairing of wine food. When matching wines with chocolate, your best option is to match lighter, a lot more elegant flavorful chocolates with lighter bodied glass of wines as well as likewise, the more powerful the delicious chocolate, the more full-bodied the red wine should be. A great example is a bittersweet delicious chocolate has a tendency to combine well with an extreme The golden state Zinfandel now a more refined white delicious chocolate finishes to be mellower flavor, making it a suitable prospect for a Sherry. This might make a really interesting as well as one-of-a-kind Valentines Day. Obviously you may not require the delicious chocolate candies in all depending on what your companion likes an excellent a glass of wine can be by itself can be great method to commemorate.
Another great idea plan is to opt for even more then simply the flowers and also sweet plus however you add a charming dinner with a glass of wine. Something concerning a candle light supper with that said unique a person as well as if by chance you have youngsters locate a baby caretaker nevertheless it is quite difficult to set an enchanting setting with your children having fun with there food. If you seem like making the dinner yourself after that go for it you can discover great deals of fantastic dishes on our website listed here along with others. Currently if you do not feel like cooking after that buy out from a good restaurant which I would certainly suggest you do in advance of time well before that night.
Another good idea strategy would to plan an escape feasible to good bed and morning meal in Red wine nation. Not just is this a fantastic way to hang out with each other for this holiday but it can likewise be a fantastic method to celebrate various other unique occasions. There is absolutely nothing like avoiding all of it as well as loosening up in the country as well as delight in neighborhood a glass of wine food matching. Naturally this suggestion you require to prepare in advance for the event and also make certain that you get your obtain your aircraft tickets and also appointments at the b and b and I would certainly recommend calling a minimum of 4 to 6 months head of time depending upon where you plan on going.
With Any Luck these Valentines Day suggestions will certainly assist you this year or at the very least provide you some originality’s for that special day. Certainly with any kind of big day keep in mind to have a good time and enjoy each others company and possibly dance the evening away with each various other.
The most essential thing to bear in mind as you commemorate attempting brand-new red wine food matching is to enjoy and also appreciate on your own with your family and take pleasure in the food, wine and also discussion.
We wish you appreciated this post which you will certainly take the time to see our website listed here.
Buy California A Glass Of Wine
Posted onBuy California Wine
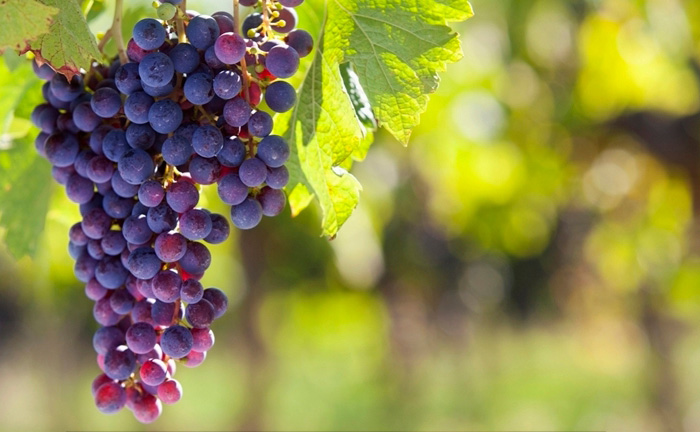
Most of the American Wines are mass-produced basic red wine; often having the brand of the area where these are created.
Regarding 90 percent of American Red wines are generated in The golden state area. The cold locations like Napa Valley, Sonoma Country etc are the various other A glass of wine creating regions. The most prestigious white wine brand – Zinfandel produced exclusively in California. This Red wine is almost equivalent to any kind of classic European a glass of wine. The golden state White wines have much alcoholic materials, scent and flavour compare to any kind of European A glass of wine.
Another old The golden state White wine is Angelica; it is come from by a European Variety brought to California in 18th century by the Spanish site visitors.
The California Red wine is being the best choice amongst the Wine-lovers. The appreciators of California Wine are scattered around each corners of the World. It is not constantly possible for the Wine-lovers or for the Wine-collectors to go to The golden state and also buy its Red wine. They can purchase it on the internet using the websites dealing with online a glass of wine purchases.
The real red wine lovers and even the amateur white wine fans are really commonly anxious to get uncommon species of white wine from different countries; to satisfy their demands a very easy means is to purchase it online via different internet sites deal with online a glass of wine transaction.
Procedure to acquire Californian Wine online has actually become very much easier today and also as time passes it will certainly be much easier. The purchasers must choose first that which red wine ought to be gotten. The purchasers can take the aid of any Online search engine to search the on the internet wine sites. After getting all the appropriate web links they can browse it as well as after that pick the appropriate one. After selecting the appropriate red wine customers can acquire it online; it does not matter whether he is a white wine collection agency or a wine enthusiast. As there are great deals of websites dealing with the online white wine transaction the customers can compare the costs, produced years and various other functions of the white wine.
The complexity of getting red wine online is very much less; it is as very easy to surfing the net. There are thousands of A glass of wine shippers managing this company as well as they utilized to maintain all the privacy a customer wants. The on-line Wine websites utilized to have the assistance desk for their clients to figure out their troubles. By the merit of online Red wine transaction an amateur white wine fan can taste Red wine from abroad without having any type of key or visa!!!
Reasons behind the price-hike of White wine:
The consumers should understand the variables that inspire the a glass of wine costs. As the California’s Red wine Sector has arise in last few years, this for a little while growth is a double-edged sword for a client. Competition in the Californian Wine Market is getting a lot more extensive and also impactive that lots of unusual glass of wines are priced very aptly; while some ordinary glass of wines are marketed in extremely high price.
The rates of A glass of wine are influenced by the marketing strategy of the product.Packaging, labelling and also promo not constantly impact the criterion of the Red wine however the cost is influenced by these. The innovations as well as concepts that are used in the Vineyards are occasionally in charge of the price-hike. Some renowned Wineries have their reputed brand name of glass of wines which are extremely high in rate.
It is really unfavorable that the customers always have the principle that the low cost glass of wines are not so exceptional in quality. This makes the Winery owners to alter their item rates requirement. The Vineyard owners utilized to rely upon the choices of the customers.
The Customer should keep the adhering to things in their mind prior to getting White wine online:
AS White wine is a living point it needs an added treatment in order to maintain its high quality standard. Tussle throughout the delivery in some cases abolish the merit of the red wines which is sustained by a long-term process. According to the Red wine specialists red wine ought to be gotten several week before to open it. The Red wine ought to be kept in dark with a corked cap to make it fresh and also preserved. A decent corkscrew is needed to unscrew to impress the visitors.
Last but not the least, for the on-line ordering of A glass of wine a grown-up needs to be in your house to obtain the shipment when it gets here. The unaccepted Glass of wines are typically return back to the storage facility and it is really hard to get it back from the storage facility. Furthermore the white wines transferred in the storage facilities are often loose its top quality and also taste.
Paso Robles Wineries Reviewed: Martin & Weyrich Wineries
Posted onPaso Robles Wineries Reviewed: Martin & Weyrich Wineries
Are you in the procedure of preparing a journey to Paso Robles, The Golden State? If so, you might be seeking to visit a vineyard. Paso Robles is popular for their large array of first-rate wineries. While you do have a number of different choices, Martin & Weyrich is one that you will certainly intend to see.
The Martin & Weyrich Sampling Area is situated at 2610 Buena Vista Drive in Paso Robles, California. It is only a few miles east of the widely known Highway 46. Their sampling room is open to the public day-to-day from 10 till 6 in the summer, with a little much shorter hrs in the winter season.
To comprehend the charm and also value of a vineyard, it is essential to familiarize yourself with its history. The background of Martin & Weyrich started in 1981. According to the winery’s main website, the two households initially planned to create Nebbiolo, which is a red grape from Italy’s Piedmont region. Nonetheless, they were quickly producing far more, including Zinfandel, Chardonnay, as well as Pinot Grigio, just to call a couple of.
When checking out any kind of vineyard in the Paso Robles location, a browse through to the sampling space is a must. At Martin & Weyrich, you will certainly discover a sampling space that leaves you really feeling like you remain in Italy. According to their website, it is motivated by the Italian Tuscan Estates. Most notably, it is filled up with high-end, yet affordable red wines.
Red wine sampling is one of the lots of benefits to checking out a vineyard. Tasting and also sampling a large choice of wines becomes part of the enjoyment; nevertheless, you might have your sights on finding that ideal red wine. If that is the case for you, Martin & Weyrich is the place to be. Their educated team can assist you discover the excellent a glass of wine for your desires and also needs. Whether it be finding the most effective preference or the very best a glass of wine to couple with supper, you can find it at Martin & Weyrich.
In enhancement to seeing the sampling space, drop in the present shop. It is considered four-star. Are you seeking a keepsake of your journey or a gift for buddies? Whatever your desires, you can find it in their amazing present shop. At Martin & Weyrich, you will discover a glass of wine logo apparel, red wine accessories, pottery, red wine books, white wine cookbooks, grape seed oil, and much more.
Similar to several prominent vineyards, Martin & Weyrich hosts several occasions yearly. Depending on when you check out, you might discover a musical show, a woman’s night out event, or a set up white wine excursion. You can see their web site at MartinWeyrich.com for info on upcoming events.
If you stay in or around the state of The golden state as well as plan to make several journeys to the area, you may intend to enlist in a Martin & Weyrich club. When doing so, you might get free white wine and also substantial discount rates. Wine club participants can additionally visit the tasting space complimentary of cost. For an economical charge, you receive so much in return.
As formerly stated, Paso Robles, California is house to numerous wineries that are open to the public. With a multitude of wineries to pick from in the Paso Robles location, you may be interested regarding what is so excellent regarding Martin & Weyrich. In addition to their world-renowned white wine, their team comes extremely evaluated. What could be far better?
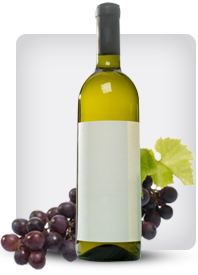
Featured wine
popular posts
-

“High-alcohol Zinfandel reviews”
7-02 2026titled “High-alcohol Zinfandel reviews”. — High-Alcohol Zinfandel Reviews: Power, Balance, and the Art of the Bold In the world of red wine, few varietals Read More
-
re is a professional English article tailored to the topic “Aging potential of premium Syrah,” written in a formal, wine-industry style
7-01 2026— Title: Aging Potential of Premium Syrah Introduction In the pantheon of noble red wine varieties, Syrah often occupies a paradoxical position. While it Read More