Tag: Wine
The Elegance Of Red Wine: A Newbie’s Guide
Posted onThe Appeal Of Red Wine: A Newbie’s Overview
The hit comedy movie Sideways is concerning a trip in the wine nation of sunny The golden state where the two major personalities, Miles as well as Jack, preference copious quantities of red wine while managing significant life dramatization. It’s an amusing film that touched many individuals with its dark comedy and genuinely moving portraits of people handling love, pain, and also wine tasting.
But maybe the greatest aspect of Sideways was just how it motivated so lots of individuals to go out and end up being lovers of fine wine! According the Web Movie Database, the motion picture made many of its followers intend to acquire Pinot Noir (a completely dry red wine) that sales substantially increased in the United States and UK during and after its release. Discuss the impact of motion pictures on individuals!
If you intend to learn a little bit extra regarding red wine, completely dry red wine, and its various other versions but feel clueless about the entire point, here’s a quick wine guide; a red wine for dummy guide if you like!
Why is Red Wine … Er … Red?
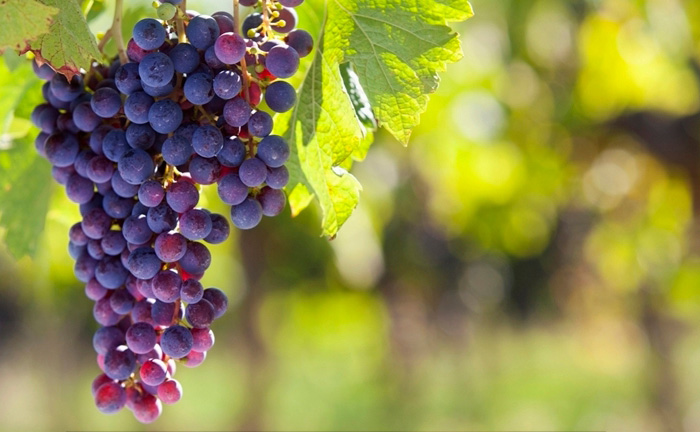
Red wine is so tinted due to the grape skins involved. There are a wide range of grape types, each as varied and also vivid as the following. You have purple, maroon, crimson, light red– the checklist goes on. Each selection brings a distinct shade of red to red wine and also the different shades you can see in wine shops are a direct outcome of the several grapes made use of in around the world wine-making procedures. A private wine’s color depends largely on just what sort of grape was utilized to make it and the length of time the skin was left in with the juice before being extracted.
What Are The Different Kinds of Red Wine?
There are various kinds of red wine yet they are typically evaluated by their “body”. For instance, a light-bodied wine is not as well requiring on the mouth as well as taste. It matches food that is flavor intensive. An example of this kind of wine is the French red wine Beaujolais Nouveau.
On the various other hand, there is the medium-bodied red wine which is a somewhat larger wine (e.g. Shiraz, Red wine, and so on) but not as hefty and also as powerful as a full-bodied wine like French Bordeaux wines and Italian red wine like the Super Tuscans. Robust wines are denser and also have greater alcohol web content.
How Is Red Wine Served?
You may have observed at some events, sampling events, or formal events that red wine is served in a particular glass. It is claimed that an oval or egg-shaped glass that tightens as it arrives(compared with a slim, high glass) is the ideal method to value red wine as it allows the wine to breathe and also swirl better. The most effective temperature to serve red wine is 60-65 degrees Fahrenheit. Serve it as well warm and the alcohol can be overly emphasized; also cold as well as it will taste bitter.
Red Wine– Exactly What Are The Different Varieties?
There are a number of red wines readily available from throughout the world from completely dry red wine to robust wine to age old wine. There is actually no such thing as the most effective red wine– exactly what is tastiest to you ought to be thought about the most effective. Yet then there are many merlots that come highly recommended like Californian red wine, Australian red wine, and afterwards certainly each kind of wine through out Europe like Spanish red wine and the ones formerly mentioned.
In time, you will have the ability to establish precisely just what your kind of red wine is. For currently, why not example the many great sampling wines out there like Syrah, Cabernet Sauvignon, Cabernet Franc …
How Healthy And Balanced IS Red Wine?
Red wine 101 these days will inform you that red wine or dry red wine is in fact great for you. There have actually been recent studies by researchers in the UK that suggest a glass of Cabernet Sauvignon-derived wines will do the heart extremely great.
So, if you’re looking to spruce up your dishes or simply want to establish a healthier diet, red wine or completely dry red wine could be just the important things for you. Ideally, this has actually been sufficient details to whet your cravings. Pleased wine drinking!
Cabernet Sauvignon – satisfaction of California wine society
Posted onCabernet Sauvignon – pride of California wine society
Cabernet Sauvignon is a preferred kind of red grape. It is extensively made use of for wine production around the globe. It shares the top position with Chardonnay which is a green skinned grape varieties. Cabernet Sauvignon is commonly grown in practically every wine-producing areas of the world. This grape variety needs an extensive growing season to be ripened correctly however the major imperfection of this certain grape is – it produces really reduced.
The Cabernet Sauvignon berries have really hard skin which protects it from various illness as well as wastage as well as supplies it power to endure the autumn rainfalls. Due to these certain homes as well as excellent fragrance, Cabernet Sauvignon has become world vast prominent.
The ideal growing locations for Cabernet Sauvignon remain in semi-arid regions, fitting a lengthy-growing period with well-drained and also not-high-fertile dirts as well as with moderately warm environment. The most effective examples of Cabernet Sauvignon generating areas are Sonoma Nation’s Alexander Valley, vast areas of Napa Valley and Paso Robles area of Central Coastline.
Like other imperial wine grape groups, Cabernet Sauvignon is also of the Vitis vinifera varieties. Inning accordance with the genetic science, it is the resultant result of a cross in between Cabernet Franc and also Sauvignon Blanc.
This certain grape is utilized in nearly every Bordeaux wines. Various merlots are assembled with Cabernet Sauvignon grapes, such as Red Bordeaux which is considered as globe best red wine.
Cabernet Sauvignon acquired the top location in The U.S.A.’s prominent merlots graph in early-60s. It snagged the starting point from “wine red” and till currently it is the “numero uno” of American wine fan’s checklist.
The Cabernet Sauvignon grape has thick skin which results high tannin in wine. This provides the wines framework as well as ageability. This residential or commercial property with regular aroma and also a financially rewarding coating also has the tendency to lack mid-palate richness as well as it is frequently joined less tannin, but “mushy” taste grapes; such as Red wine as well as Shiraz or Syrah which are located particularly in Australia.
Cabernet Sauvignon deals with a variety of fragrances as well as flavours. This intends to the floral facet when it not completely rips with capsicum, however when it tears – it biases to the flavour of blackcurrant. In California and Chilean cabernet, the flavours of mint or eucalyptus are located. It has a wonderful scent. In the old wines it was characterised with black present, violets and also seasoning smells. In the brand-new globe wines the flavours of delicious chocolate, ripe jammy berries, oak are also located along with that old days flavours. Cabernet Sauvignon tastes dynamic in the mouth and also teems with splendor, but it is bit acidic.
Home Wine Storage Space – Guidelines in order to help You Choose the Perfect Wine Cellar
Posted onWine storage space is essential to anybody who is a great wines collector. The storage of your wines could be as important as the wines you pick as your favorites. There are many means to save your wine, however regardless of which type of wine storage space you choose you will certainly need to maintain the space conditions consistent.
House wine cellar are particularly made for saving your wine bottles in a horizontal position. Storing your bottles in a wine rack is required to protect against the corks from drying and also in order to help preserve the quality of the wine. If your cork comes to be completely dry it can shrink as well as allow air into the bottle, leading to oxidization which will certainly ruin the preference.
The standard bottle owner will generally have different areas for the individual bottles which is necessary to permit air to distribute around the bottles. Wines need to be kept at a consistent temperature of around 55 degrees Fahrenheit, with a loved one humidity of 70%. You should never keep wines in a cozy, well light place; this can heat up the wine and also trigger it to spoil. Likewise keeping exact documents of your wines is a great idea so you know just when to open the excellent container.
If you like many customers and also you don’t have a wine rack for your growing wine collection, there is a significant choice of wine owners specially created for home usage. If you want to maintain a few of your favorites available, then a wall installed wine shelf might be just for you. This sort of shelf is hung on the wall, which is hassle-free to have a couple of bottles on display and also convenient in any way times. Frequently, these wall shelfs have stemware owners, so you could keep your glasses in the exact same place. There are a number of kinds of bottle holders available.
Some are designed to fit on a kitchen counter, or towers that are stackable to position on the floor. The towers are made to grow as your storage requires modification. There are lots of finishes available to pick from; a steel wine owner could be made from ornately crafted iron, stainless steel, light weight aluminum or chrome. Wooden wine cellar are likewise extremely popular, made from various woods such as ache, oak or mahogany. Whatever style of your decor, there makes sure to be a wine owner that suits perfectly.
Relevant Merlot Wine Articles
Drinking as well as Enjoying Red Wine – Health Advantages
Posted onWhile drinking alcohol to excess causes illness in several organ systems, you have actually possibly likewise become aware of merlot wellness benefits when drunk in small amounts. Long standing research backs up the advantages, yet previously researchers couldn’t describe exactly just how this could function.
“Records on the benefits of merlot are practically 2 centuries old,” mentions Lindsay Brown, associate professor in the Institution of Biomedical Sciences at The College of Queensland.
“The media created the a lot more current story of the French mystery in the early 1990s. Nevertheless, studies on the activities of resveratrol, among the energetic non-alcoholic ingredients, were unusual till research study around 1997 revealed prevention of cancers. This brought about a dramatic passion in this compound.”
Not surprisingly, merlot unites a complicated mix of anti-oxidants and various other substances, one of which is a polyphenol referred to as resveratrol that is showing itself to have some outstanding condition prevention capabilities.
The health benefits of this compound are absolutely impressive, everything from stopping cancer to safeguarding the brain as well as heart from damage and also age-related illness, reversing diabetes mellitus, decreasing “poor” cholesterol, stopping embolism, weight problems as well as more.
Yet by much one of the most interesting bit is the way the body obtains the valuable substances.
It shows up that absorption of resveratrol via the mucous membranes in the mouth results in around 100 times the blood levels of the compound compared to an enthusiast would certainly obtain via the digestive system and liver.
These body systems inactivate this useful material, so those put away glasses don’t deliver the resveratrol to the bloodstream.
Sips that are sluggish and savoring job much better enabling the absorption of this oh-so-beneficial compound.
Though it sounds complex and also intricate, experts have actually found that high doses of resveratrol enhance a procedure called apoptosis (set cell death); while lower doses are believed to enhance cardiac health and wellness by avoiding cell damages.
A most likely description for this level dependent result is that smaller concentrations of the substance trigger cell survival mechanisms, while high focus transform on constructed in death signals in those very same cells.
The compound might additionally help preserve health by removing extremely reactive oxidants in the body while assisting the supply of blood to cells.
“The most basic description is that resveratrol switches on the cell’s very own survival pathways, protecting against damages to individual cells,” clarifies study writer Brown. “Further mechanisms assist, consisting of eliminating very responsive oxidants in the body as well as improving blood supply to cells.”
If red wine isn’t really your thing, experts suggest that by eating a few servings of blueberries (or red grapes, purple grape juice, peanuts or some berries) a day from now on you might well get the exact same benefit.
You could likewise have actually become aware of resveratrol and also red wine wellness benefits current or on recent 60 Minutes records, yet watch out for supplement asserts that usage video from the report, or point out an endorsement of Oprah Winfrey’s clinical professional, Mehmel Oz, M.D. Dr. Oz hasn’t already endorsed any kind of item.
Wine Storage Fridges – Protect Your Financial Investment in Great Wines
Posted onDo you delight in consuming fine wines, sharing them with dinner guests and buying costs bottles? If so, you possibly recognize the value of correct storage space for keeping your wines tasting their best and for avoiding putridity.
Preserving the perfect temperature for every type of wine is the only way to keep them effectively and the very best method to enjoy them. There are numerous kinds of wine storage space fridges readily available that will certainly make keeping your wine simple as well as enjoyable. Maintain reviewing to learn which kind is ideal for you, as well as why you must bother.
Shield Your Investment in Fine Wines
Wine intake in the US has actually raised significantly over the last 15 years. Many wine enthusiasts invest substantially to appreciate their faves, so it makes good sense to safeguard that investment and obtain one of the most from every container.
Commonly, a wine storage is used to stay clear of harmful temperature level changes, but couple of can pay for the area as well as cost demands of structure and also preserving a wine storage. Wine storage space fridges are a functional alternative to a wine rack that can maintain as well as keep the optimum flavor of all your wines.
The Significance of Temperature Level in Storage Wine
The flavor as well as clarity of wine deteriorates with changes in temperature, and also every lover recognizes that proper temperature level is vital for obtaining the finest flavor. The ideal temperature level relies on the variety. A chardonnay needs to be chillier than a Chianti, which subsequently needs to be cooler than a Bordeaux.
A regular refrigerator can not possibly suit these precise needs, specifically if you intend to keep more than one range chilled at the exact same time. For these reasons, wine storage space fridges ought to be taken into consideration to secure your investment and also boost your pleasure of your collection.
Types of Wine Storage Fridges
A number of kinds of fridges are offered to fulfill your space as well as budget plan problems. For maintaining numerous bottles handy for dinner celebrations, a built-in under-counter fridge might be ideal. These units can enhance any kitchen style and also can even be fitted with a customized overlay to match your cabinets.
A bigger collection could be much better suited to a free-standing refrigerator. Free-standing versions are offered in an extremely basic style or as an elaborate furniture suitable for any area. These kinds of wine storage space fridges can be found in dimensions to store a couple of containers to up to 1000 bottles.
Wine storage refrigerators are a need to if you want to protect the optimal flavor of all your wines. An investment in a chilled storage space service will secure your investment in great wines as well as enhance your enjoyment of them by making it easy for you to maintain correct temperatures. With a variety of built-in as well as free-standing versions on the market, you’re certain to locate the type that is best for you.
Locate More Pinot Noir Wine Articles
Featured wine
popular posts
-

re is a professional English article formatted for the WordPress block editor (using core/paragraph, core/heading, core/list, and core/separator blocks)
6-22 2026How to Pair Syrah with Lamb Few culinary pairings are as classic and satisfying as lamb with Syrah. The wine’s inherent structure—marked by dark Read More
-
re is the professional English article as requested
6-21 2026— Title: Small Producers Making Exceptional Malbec In the world of wine, Malbec has long been defined by two distinct identities. On one hand, Read More